Drive Belt Replacement
[ Belt Removal | Belt Installation | Belt Tension Chart ]
Description
This page explains how to replace one or more of your drive belts. The numbered sections are described in a special order. In order to replace the second belt, you need to remove the first, etc. It is usually best to replace them all at once anyway. Be sure to inspect the pulleys carefully. Look for bent or glazed inner surfaces. If the pulleys are glazed, you can sand off the glazing with a piece of emery cloth. If your timing belt is well worn, you might want to consider replacing it while the other belts are off.
Belt Removal
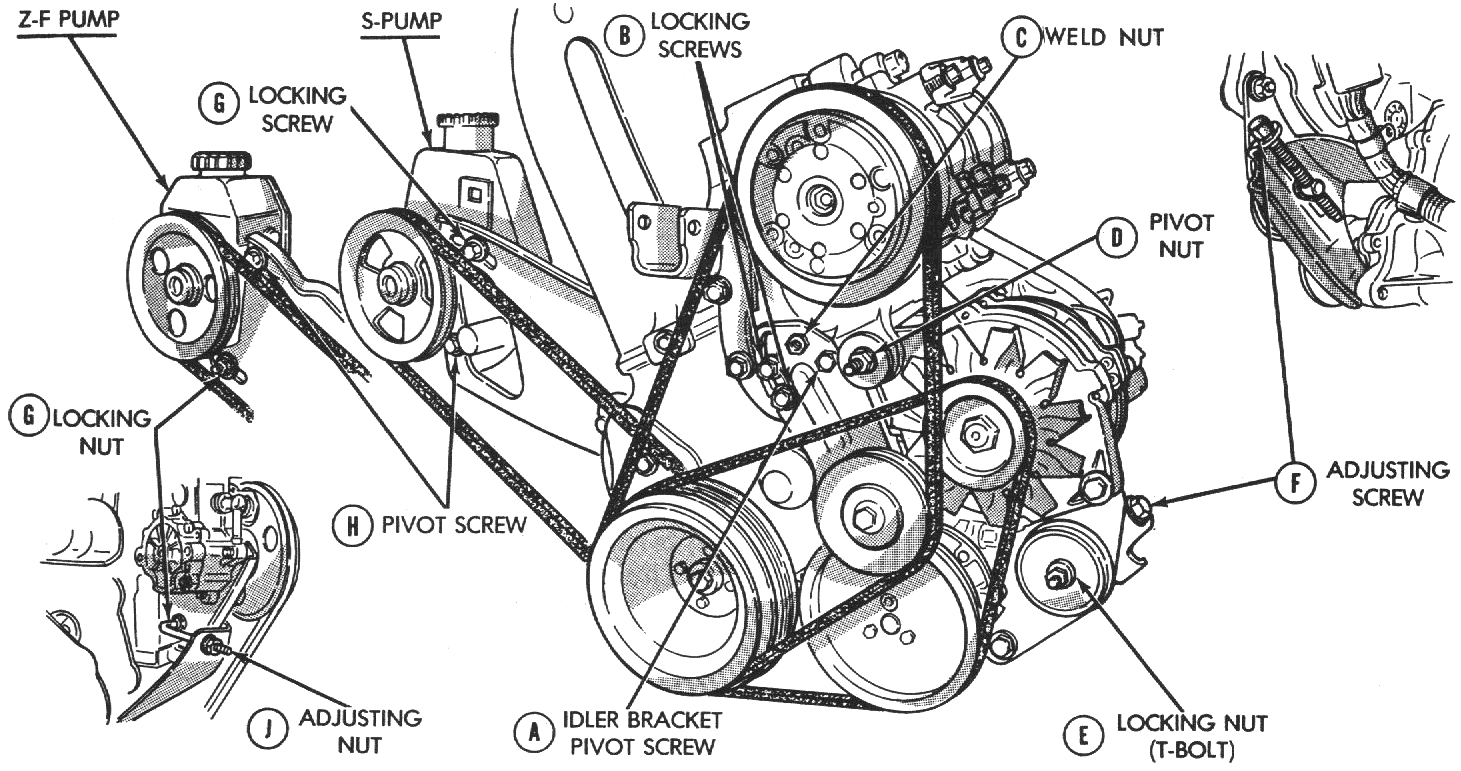
1) A/C Compressor Belt
- Loosen the pivot bolt (A) and locking bolts (B) on the A/C compressor belt idler pulley and remove all tension.
- Flip the belt over the lip of the idler pulley and remove the belt.
2) Alternator/Water Pump Belt
- Loosen the alternator pivot nut (D) and locking nut (E).
- Remove belt tension by turning the alternator adjusting bolt (F) counter-clockwise until the belt can be removed.
3) Power Steering S-Pump Belt (1987 and earlier models)
- Loosen locking nut (G) and pivot bolt (H). The pivot may be more accessible from under the vehicle.
- Rotate the pump all the way towards the engine and remove the belt.
3) Power Steering ZF-Pump Belt (1988 and later models)
- Loosen the power steering pump pivot bolt (H) and locking nut (G).
- Remove belt tension by turning the power steering pump adjustment nut (J) counter clockwise until the belt can be removed. This bolt may be more accessible from under the vehicle.
Air Pump Belt
- Remove the nuts and bolt holding the belt cover in place and remove the cover.
- Remove the locking bolt and pivot bolt and move the air pump out of the way.
(click here for a printable image)
Belt Installation
1) Power Steering S-Pump Belt (1987 and earlier models)
- Install the belt onto the pulleys and insert a 1/2" breaker bar or torque wrench in the adjusting bracket.
- See the tension chart below for proper belt tension. The torque method can be used for this belt.
- Once desired tension is achieved, tighten the locking bolt (G) to 40 ft-lbs (54 N-m).
- Tighten the pivot bolt to 40 ft-lbs (54 N-m).
1) Power Steering ZF-Pump Belt (1988 and later models)
- Install the belt onto the pulleys.
- Tighten the adjusting bolt until the belt has reached the desired tension (see chart). Do not torque the adjustment bolt to the torque listed in the tension chart. Only use this value if a square hole has been provided for a torque wrench on the bracket. Otherwise, use the gauge or deflection values.
- Tighten pivot bolt and locking nut to 30 ft-lbs (41 N-m).
2) Alternator/Water Pump Belt
- Install the belt onto the three pulleys, making sure that it is centered on each.
- Tighten the pivot nut (D) to 30 ft-lbs (41 N-m).
- Tighten the adjusting bolt (F) until the belt has reached the desired tension (see chart). Do not torque the adjustment bolt (F) to the torque listed in the tension chart. Only use this value if a square hole has been provided for a torque wrench on the bracket. Otherwise, use the gauge or deflection values.
- Tighten locking nut (E) to 30 ft-lbs (41 N-m).
3) A/C Compressor Belt
- Install the belt onto the three pulleys.
- Adjust the belt tension by placing a wrench or torque wrench on the weld nut (C) on the idler bracket and rotating it counter-clockwise. The torque listed in the tension table applies to this nut.
- Once the desired tension is reached, tighten the locking bolts (B) to 40 ft-lbs (54 N-m).
- Tighten the pivot bolt to 40 ft-lbs (54 N-m).
Air Pump Belt
- Install the belt onto the pulleys while positioning the air pump in place.
- Install the pivot bolt and locking bolt finger tight.
- Once the desired tension is reached, tighten the locking bolt to 25 ft-lbs (34 N-m).
- Tighten the pivot bolt to 25 ft-lbs (34 N-m).
- Reinstall the air pump belt cover and torque the nuts and bolt to 40 in-lbs (4 N-m).
Belt Tension Chart
These tensions apply to the diagram above. Each belt has two sets of values for new and used belts. The "Gauge" column provides the value to be used for a Burroughs tension gauge. The "Deflection" column provides the amount of deflection present at the center of the longest section of the belt when 10 lbs (44N) of force is applied to that position. Use a simple spring scale to achieve the proper amount of force. The "Torque" column provides the torque to be applied to the accessory bracket where a square hole or weld nut is provided for a torque wrench.
| Drive Belt |
|
Gauge |
Deflection |
Torque |
| A/C Compressor |
New |
105 lb |
5/16 in (8 mm) |
40 ft-lbs (54 N-m) |
| |
Used |
80 lb |
7/16 in (9 mm) |
30 ft-lbs (41 N-m) |
| Alternator/Water Pump |
New |
115 lb |
1/8 in (3 mm) |
110 ft-lbs (149 N-m) |
| |
Used |
80 lb |
1/4 in (6 mm) |
80 ft-lbs (108 N-m) |
| Power Steering Pump |
New |
105 lb |
1/4 in (6 mm) |
75 ft-lbs (102 N-m) |
| |
Used |
80 lb |
7/16 in (9 mm) |
55 ft-lbs (75 N-m) |
| Air Pump |
New |
- |
3/16 in (5 mm) |
45 ft-lbs (61 N-m) |
| |
Used |
- |
1/4 in (6 mm) |
35 ft-lbs (47 N-m) |
Updated 10/31/2003.
Copyright © 1996-2003 Russ W. Knize.