A Two-Stage Boost Bleed
Description
Here is Gus Mahon's procedure on how to install and setup a two-stage boost
bleed. This design can be enhanced for those with stick shifts by
using the Two-Stage Boost Bleed Controller.
Procedure
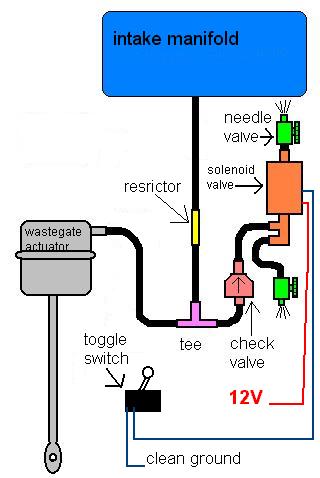
-
Remove the tube coming out of the wastegate actuator can, and plug the
hose. Run a new short rubber vacuum line directly from a source of
boost pressure to your waste gate actuator's nipple (hose barb).
(Turbo output to actuator, or intake manifold to actuator.)
-
Now you have to find the factory plastic tubing connector with the brass
pinhole inside. It's in the wastegate solenoid vacuum lines that
you've just rendered useless when you ran your new (manifold pressure-to-wastegate
actuator) rubber tubing, OR it might be in a tube that comes straight out
of your turbo, like on my 89's. It looks like a colored plastic straight-line
vacuum tubing connector, but it's got a brass insert with a pinhole in
it. On the factory vacuum line diagram, it?s labeled "orifice".
-
Your new rubber line should be cut in half, and spliced back together again
with the factory "restrictor-orifice" connector. Yes, that straight
plastic tubing connector with the brass pin-hole fitting inside.
Now you have a direct tube from intake manifold, or turbo, to wastegate
actuator "can", with a restrictor-orifice in the line, right? Good.
-
Locate a junkyard solenoid air valve similar to the stock solenoids that
came on your car. Zillions of old junkyard cars have these solenoid
valves in them; not just turbo cars. They're used in Fords, Chevies,
you name it. Dodge Colts are my favorite; they usually have four
of them in a row on the passenger's side of the engine block. They
simply direct vacuum or boost from one tube to another. Many of these
solenoids have 3 hose-barbs sticking out of them. That's the kind
you want. That's what the Colts have. You can always blow through
the center barb, or nipple. When the solenoid is off, the air you
blow in the middle barb will flow out one end-barb. When you apply
12 volts to the solenoid's 2 wires (doesn't matter which is neg or pos),
the air you're blowing in the middle will come out the other end.
That's how you test to make sure they work. Do it. At a local
yard, I cut out 20 of them, and the guy charged me $20. A buck apiece.
[Note: see the Understanding Solenoids
page for more information on solenoids]
-
Cut your new rubber line in half again, in between the restrictor (pinhole-connector)
and the wastegate actuator "can". Get a vacuum line "tee", and push
the two tubing halfs you just cut onto the tee. That leaves one nipple
of the tee open. Mount a one way check valve to the open nipple so
that it lets air blow out, but won't let air get sucked in. Make
sure you point it the right way! Now get that junkyard solenoid you've
tested. With short rubber tubing, connect the check valve to the
center nipple of the solenoid. You can always blow through the center
nipple; on or off.
-
The bleed-off valves can be simple air valve from a cheap (some less than
$1) aquarium valve to a $20 precision brass needle valve. [Note:
see the
Choosing A Bleed Valve page for
more information] Crack one bleed-off valve open SLIGHTLY, so you
can barely blow thru it. With another short piece of tubing, connect
that bleed-off valve to the end nipple of the junkyard solenoid valve that
you CAN blow through when it's turned off. Then crack the other valve
open, so that your mouth can blow a little more air through it than the
first one. Connect this valve to the end nipple that you CAN'T blow
through when the solenoid's turned off.
-
Install a single-throw single-pole toggle switch (simple on-off toggle)
on your dash. Ground (good & clean) either one of the toggle's
two wires on or near your dash. Solder a long extension onto the
other toggle wire, shrink-wrap it, and run the wire thru the firewall.
Under the hood, connect this wire to either one of the junkyard solenoid
valve's wires. Take the only remaining solenoid valve wire and run
it to positive that's only live when the car's on. (little 1 amp
inline fuse not a bad idea) YOU're DONE! [Note: see the Two-Stage
Boost Bleed Controller page for alternatives to the toggle switch]
Now you dial it in. Take a ride. Nail it in high gear, with
the toggle off, then flip the toggle "on" while under boost. If you
SLIGHTLY opened the bleed valves, as I said, you won't hit cutout.
You'll have 2 random boost setting; say 8lbs & 11 lbs. Just keep
adjusting the low valve (the one you barely cracked open) until you get
the low level that you want. Then leave the toggle "on", and keep
adjusting the high setting until you get whatever you want up to13 lbs
or so. Read your rich-lean gauge, or read your sparkplugs, to make
sure you've got enough fuel. Lean-out is bad!
The beauty of this setup is this: you can come out of the hole
like gangbusters without burning your tires up, at 7 lbs or so, then flip
the toggle "on" to 13 lbs after you've already launched. With this
setup and launch technique, the boost will not spike to cut-out!
Flooring the car on "low", then flipping on the toggle after you already
hit your "low" boost setting, will raise you to your 13lb setting, while
nearly eliminating spiking. You might now be able to run 14 lbs without
spiking to cutout!. As I said earlier, check the health of your fuel
system. Read your sparkplugs. Don't lean out. I've done
this to many cars with no problems. This simple hi-lo switch knocked
.2 off my launch, years ago, and stopped my spiking. Launch hard
on 7 lbs, flip it to 12 or 13 lbs about 20 feet out, and you will burn
less rubber, while running faster. Once you get the hang of using
the switch, you should really improve on those low-traction stoplight street
launches that tend to fry your tires right now.
This page is maintained by Russell W. Knize and was last updated 09/16/98.
Comments? Questions? Email
minimopar@myrealbox.com.
Copyright © 1996-2003 Russ W. Knize