This page is devoted to a simple electronic circuit that is used
as the center of a series of
Electronic Engine Performance
Controller (EEPC) applications. It consists of a basic LM339
quad comparator with some support circuitry to make it stable. The
comparator compares a DC input signal to a preset threshold and produces
an output dependent on how you configure it. This configuration will
be discussed in detail below. Be sure to read the entire contents
of these pages.
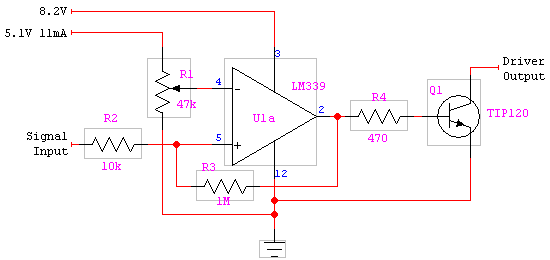
As a positive response circuit, the output of the circuit is on, when the input voltage is higher than the reference voltage. Here is the schematic that shows one of the four comparators inside an LM339 configured as a positive response comparator:
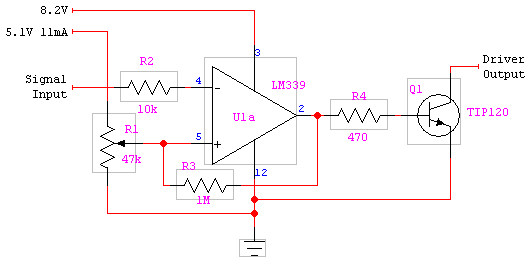
As a negative response circuit, the output is on when the input voltage drops below the reference voltage. Here is the schematic:
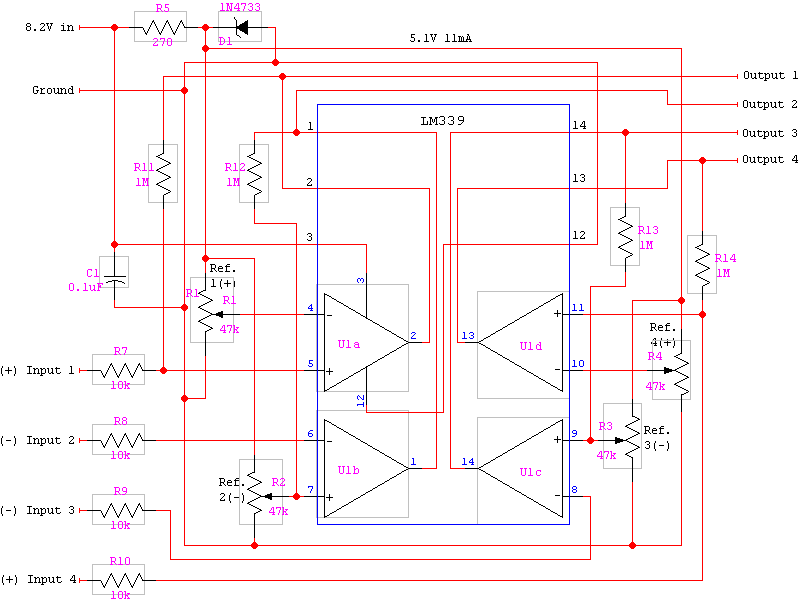
As you can see, the circuitry requires two power supplies: an 8V supply to power the comparator and a 5V supply for the reference. The seperate power supply is important to make the reference very stable to prevent oscillation. This is done with a simple 5.1V zener diode and resistor power supply, which can be used for all the references in the circuit. The schematic below shows an example all four comparators in the LM339 being used. Two (1 and 4) are setup as positive response circuits, while the other two (2 and 3) are negative response. It is layed out to show the physical pin locations on the chip. It also shows the 5V power supply for the reference (D1 and R5), but the 8V power supply and the driver transistors are not shown. Also missing is the input and output protection resistors and diodes, but these are included in the application schematics and are also shown and explained in a later section.
R1 - R4: These are the reference voltage adjustments.
R5, D1: These provide the 5.1V reference voltage. A 270
ohm R5 provides about 11mA of current, which is more than enough for 4
comparator references. If your circuit has many more comparators
or uses different pots (R1-R4), you may need to drop the value of R5 to
increase the supply current, but each comparator and reference (if 47k
pots are used) only requires about 0.4mA of current.
R7 - R10: These are in place to limit the input current to the
comparator so that some feedback can be provided for hysteresis
R11 - R14: These are the feedback resistors that provide hysteresis
to each comparator to prevent oscillation when the input voltage is very
close to the reference voltage. With R7-R10 set to 10k and R11-R14
set to 1M, the total hysteresis is about 81.2mV (0.0812V), which is small
enough to still provide very good response. If your input signal
is noisey and the comparator oscillates, you can decrease value of the
feedback resistor to increase the hysteresis voltage.
C1: This is a filter capacitor that is used to keep the
LM339 chip from oscillating due to noise on the power supply. Each
LM339 chip has to have its own filter capacitor and it should be put very
close to the Vcc pin (pin 3).
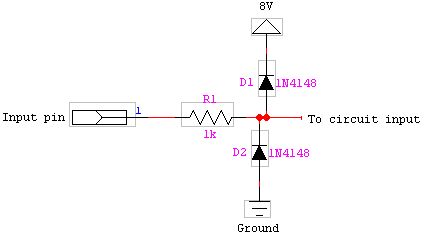
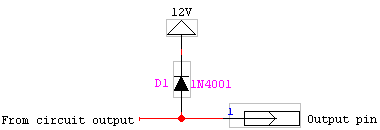
The outputs also need to be protected from a phenomena called "lash-back", when they are used to drive solenoids, relays, or motors. When the current to any of these device's is shut off, they return a voltage back to the circuit that is the opposite polarity and high voltage. This occurs because of the collapse of the electromagnetic field inside. A fairly strong diode is connected between the output and the 12V voltage input to suppress the spike. Note that this is NOT connected to the 8V supply voltage, but rather to the raw 12V from the vehicle's power.
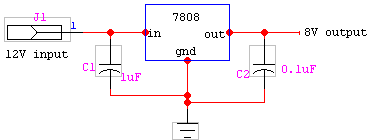
The second, and less desirable choice is another zener diode-type regulator.
Although they are very stable and work well for low-current applications,
they quickly become very inefficient at higher currents. The required
circuit would use an 8.2V zener diode and would require 38 ohms of resistance
to provide the necessary current (100mA or greater spikes are likely) at
12V. Since the vehicle's supply voltage can reach close to 15V at
times, 1.2W of power can be dissipated through the resistor! Dissipating
that much heat will eventually cause the resistor and/or zener diode to
fail, causing either a voltage failure or a loss of regulation, respectively.
In other words, don't use this method. :)
| Return to the Electronic Engine Performance Controllers page |
This page is maintained by Russell W. Knize and was last updated 04/20/99. Comments? Questions? Email minimopar@myrealbox.com.
Copyright © 1996-2003 Russ W. Knize